
Why Internal Hull Areas Should Be Accessible
Are There Bogymen in Your Basement?
by David Pascoe
During the last several months we've encountered numerous boats that have concealed compartments within the hull. We've long advanced the argument that builders should make as much of the interior of a hull as accessible as reasonably possible. Instead, the opposite, has occurred where a majority of builders today are building boats in such a way as that almost NO area of the internal hull is accessible. Not even the bilges.
Apparently either one of two things is happening. Either the builders are too stupid to know any better, or -- and we hope this isn't true -- the builders who do this think their customers are too stupid to know any better. Though surely they can't believe that there aren't some surveyors around who will fail to show this situation up for what it really is.
Creating concealed compartments in a boat hull defies all common sense and principles of good boat building for a wide variety of reasons, not the least of which was exemplified by several 10 year old Sea Ray boats that we recently looked at.
What is meant by concealed compartments are areas under the cabin sole which are separated and divided by stringers and bulkheads, and covered over by the cabin sole with no hatches. What you end up with are fairly large void spaces beneath the deck for which there is no way of knowing what is going on down there because the area cannot be seen.
Let's say that you hit something and poked a small hole in the hull. There's no way you could get at the hole to temporarily plug it up and possibly save the boat from sinking. Naturally, that sort of thing only happens to other people.
So why would anyone want to know or even care what's going on down in those blind spaces? The two Sea Rays mentioned earlier provide a very compelling answer. On one of those two boats, the deck-to-hull joints came loose and sprung some very serious water leaks. Every time the bow nosed into a wave, water would come streaming in through the deck joint.
Bear in mind that most boats leak at the deck joint because they're just screwed together, and this is where the water comes from most of the time. Yet there are numerous other ways that water can get into these hull compartments, such as leaking plumbing.
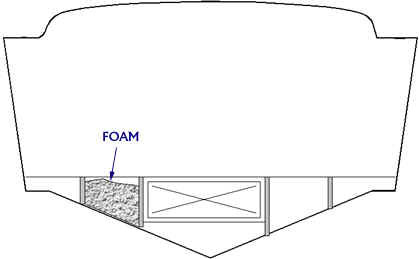
Notice here that two sets of stringers create five compartments. Then, if you add in bulkheads, each one will double the number of compartments. With two bulkheads, you could end up with 15 concealed compartments beneath the cabin sole. Do they all have drainage?
And guess where that water was ending up. Yes, right into the aforementioned void spaces. The illustration above shows how it is possible that concealed compartments formed by the stringers could fill up with water. Even when the area is filled with foam, the water is either going to lay on top of the foam, or work its way down between to foam and stringers.
Of course, your first response to this might be that surely there were limber holes in the stringers to facilitate the drainage of any water that might accumulate outboard of the stringers -- a not unreasonable response. However, in these two cases there were not any limber holes, and without any access to the area to see what was going on down there, there was no way for the boat owners to know. How would you know if there are limber holes (simply put, a limber hole is a drain hole made through any hull structural member)? When the entire inside of the hull is sealed off, neither you nor your surveyor has any way of knowing.
On the previously mentioned boats, these compartments filled up with water. On one, the blind space filled up with water because that was where the air conditioning condensation drain was routing the water. The end result was that the hull stringers rotted out-- the stringers being nothing more than slabs of plywood stapled together and painted over with gel coat instead of being fully encapsulated in fiberglass.
Unfortunately, we are finding conditions like these more and more frequently as the state of boat building today increasingly denies all common sense rules of construction (Rules? What rules?) and increasingly focuses more on high fashion and styling rather than sound construction principles.
Of course, situations like these are of little consideration to the first owner of the boat, for it takes many years for these design faults to manifest themselves into major problems, almost always long after the warranty has run out. It's the used boat buyer, the second or third owner who faces the major impact of these design faux pas.
At least in most cases, but not always. We are left to wonder how many of new boat owner's complaints of a boat's failure to achieve the advertised speeds are the results of boats that are hauling around an extra couple hundred gallons of water.
Another boat brand recently encountered sought a different solution. That was to fill the compartments with foam. The brochure for the boat claimed that filling the non accessible hull spaces with foam made them quieter. Possibly that is true, but it also had an unanticipated side effect. The water that leaks into these foam filled compartments simply fills up the irregularities of the foam-filled spaces. Then it lays there in contact with wooden hull structurals such as bulkheads and stringers with the same predictable results.
Not to mention becoming stagnant and smelling bad. Sort of like having your own private internal swamp, at no extra charge.
If what I've described here doesn't see, like a big deal, maybe I can draw an analogy that will get your attention. Imagine owning a home with a basement with no entry to the basement. You know something's going on down there but you don't know what. Of course, you know that something has to do with water, and the wonderful effects thereof.
The worst of the situation is that not even surveyors can pick up on such things. Most of the time he can't even tell if the compartments are full of water. Unless some time has passed and the water is now starting to come through the sides of the stringers. All that a surveyor can do is to state that he can't access an area, and that he has no idea of what is going on there.
The very least a builder should do is to provide some visual access to all partitioned areas in a hull, meaning any area that is closed off from other compartments.
Who are the worst offenders? Typically, the builders of "express" type cruisers and so-called "family cruisers." Most all are the same: sealed off compartments with no access. Such problems are least found in motor yachts and sport fishermen where there is less compelling reason to cut costs by eliminating the extremely high cost of cutting a small hatch in the deck.
The bottom line is that if the builder doesn't provide access to the most critical areas of the hull, there is good reason to be suspicious as to why not. Is there something to hide down there?
* * * * *
Resolving the Problem
In most cases, resolving the problem is not particularly difficult. All you have to do is create some hatches for each of the concealed areas. Pull up the interior carpet. If it's all secured with tack strips like in your home, know that boat carpet need not be installed this way. Experienced owners just lay the carpet down and leave it loose so that it can be removed easily. If you've got foam padding under it, it won't move much.
Next, locate the stringers and suitable places to cut a hatch opening. To do this, try to figure the lowest point in the hull in the forward cabin area and where water is most likely to settle. Of course, much will be determined on where you actually have the deck space to do it. Keep in mind that less than the ideal place is better than no place. You should shoot for having at least one hatch opening per area separated by stringers. Most likely you'll already have one in the center section, so that will only mean four additional hatches.
If you have an area that is covered over with something like a galley unit, which is likely, you might simply want to just use a 3" hole cutter and make an inspection hole. Just something big enough that you can shine a flashlight down there and see if any water is accumulating. To keep the hole plug from falling through, simply glue and clamp a couple of small battens on the underside of the deck. Then you can place the cut plug back in the hole you just cut.
Typically, it takes about a full day to create a set of full hatches, or you can have your yard do it for you.
A decent size hatch would be about 10" x 16" or thereabouts. Much depends on the space you have available. In contemplating cutting the deck, you have to consider the possibility of there being wires or plumbing below the deck. It's unlikely, but better safe than sorry. You could use a jig saw or sawzall, but that long blade is going to cut through a hose or wires if any exists at that point.
The better choice is to use a circular saw. Cut a pilot hole using a hole saw so that you can measure the plywood thickness. Also, check to see if the compartment is filled with foam. If so, then there's not much point in making a hatch when a couple of small inspection ports will do. But if there's water laying on top of the foam, you've got a whole different ball game.
Set the saw blade depth at exactly the sole thickness. In this way, you'll be least likely to cause unanticipated damage or problems.
Once the opening is cut, next we have to create a lip around the perimeter of the hatch in order to hold it up. Some 3" wide strips of 3/4" plywood will do the trick. It's best to cut a 45 degree miter on the ends to get a good fit.
Now, attempting to attach these battens with screws isn't going to work very well, so you'll bolt them instead. With a 3/4" plywood sole, that means that you'll need about 30 1-3/4" 1/4-20 stainless bolts per hatch. Place a batten along the perimeter with only 3/4" protruding from the under side. That means that 2-1/4" will be back under the deck, giving you a 3/4" lip. Next, you'll drill your holes in a staggered or zigzag pattern, with one row close to the edge, and another row set toward the far edge. Then, counter sink the holes for the bolt heads. This will give plenty of strength to the battens so that they won't break loose under load.
You'll find that popping the bolts in and tightening up the nuts goes quickly, and is much easier than attempting to use screws. Route or round over the bottom edge of the hatch cover and that's it.
If you've got a problem with water leakage into the compartment, now you're going to find out about it, and have the opportunity to correct the problem before it wrecks the boat. Some well-placed limber holes in the stringers will do the trick, but be sure to seal the exposed edges of any holes you make in the stringers. A little epoxy glue and light glass cloth will do the trick.
Related Reading:
Surveying Boats With Molded Integral Grid Systems
Posted July 10, 2000


David Pascoe is a second generation marine surveyor in his family who began his surveying career at age 16 as an apprentice in 1965 as the era of wooden boats was drawing to a close.
Certified by the National Association of Marine Surveyors in 1972, he has conducted over 5,000 pre purchase surveys in addition to having conducted hundreds of boating accident investigations, including fires, sinkings, hull failures and machinery failure analysis.
Over forty years of knowledge and experience are brought to bear in following books. David Pascoe is the author of:
In addition to readers in the United States, boaters and boat industry professionals worldwide from nearly 80 countries have purchased David Pascoe's books, since introduction of his first book in 2001.
In 2012, David Pascoe has retired from marine surveying business at age 65.
On November 23rd, 2018, David Pascoe has passed away at age 71.
Biography - Long version