
Repairing Rotary Vane Pumps
by David Pascoe
So the cost of boating just keeps going higher and higher (belying the notion that there's no inflation) and you're tired of paying those ridiculous yard bills? But you're not a do-it-yourselfer type and the idea of attempting to repair a pump lies somewhere between computer programming and neurosurgery?
Well, I'm going to show you how easy it is, and how the worst part of the job is getting the pump out of that deep hole so you can work on it. But here's something else you'll be interested to know. All three of the pumps used for this demonstration were pulled out of dumpsters at boat yards. And all three were repaired at a cost of nothing more than my time. Not one single new part was used! And it took a grand total of one hour and seventeen minutes to repair all three. So if you're getting the idea here that the former owner of these parts maybe got ripped off, maybe you're right.
Our first example is a Jabsco mascerator pump. Now, I'm not going to blame anyone for not wanting to repair one of these, so bear in mind that we're just using it as an example, for it's basic style is common to a lot of pumps. For pumping fluids, it use a positive displacement neoprene impeller of the sort that is considered self-priming. This resides on the inner side of the pump body, while on the outside is a simple three-pronged device that , well.......you know, mascerates the ugly stuff.
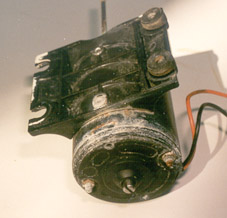
So what went wrong with this pump? The same thing that happens with nearly all of them that go bad. The pump was mounted in a location where the motor got wet. There wasn't anything wrong with the pump body. When you look at a pump motor, and it looks like what you see in the photo at left, then you can be pretty sure that water damage to the motor is involved.
So the first thing we do is take it apart. We start by pulling the nuts off the end plates. Note that the two parts are held together by two sets of long rods. When you do this, it's a good idea to take a piece of paper and sketch out the orientation of the two parts so that you won't have to experiment with how it goes back together, thereby wasting time. Having done that, we go ahead and pull apart the motor from the pump body, being very careful not to damage the paper-like gaskets. Beware, they tear easily, so treat them gently or you'll be heading out to buy replacements.
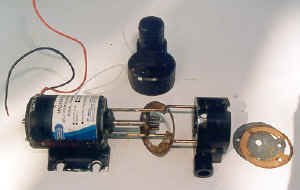
At left is an exploded view of the pump housing being disassembled. At the end of the shaft we have the three-pronged mascerator. To get it off, we gently tap the base of one of the blades with a hammer in a counter clockwise direction. It should then spin right off.
Inspect the impeller and pump housing for damage. Light scoring of the housing is tolerable while heavy scoring or wear is not. Check the impeller for damaged blades. If so, replacements are always available. In this case, it's a plastic housing so that if running dry and overheating was involved, the plastic casing may have distorted. Check to see that the stainless cover plates fit flush. If not, it's going to leak.
Next we contemplate pulling the end plates off the motor housing. While this is easy enough to do, the hard part is getting it back together in the same order that it was assembled. Below you have a view of the parts. Again, take your piece of paper and sketch out which parts go where, particularly all the little washers and seals that go on the pump end of the shaft. Having done that, go ahead and pull the thing apart.
In the photo below you see the brushes that reside on a little plate that fits into notches in the motor body. The brushes will want to fly out so that the little springs get lost. Don't let this happen.
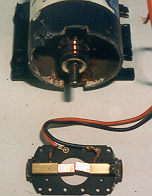
The brush holder plate removed. Notice how it fits into the slots in the motor housing. The springs push the brushes outward when it is removed.
Having gotten the motor apart, we want to see what the problem is. In this case, water got in and caused corrosion. Whether or not the the motor can be repaired is going to depend on how badly it's corroded. The armature is the large rotating part in the center with all the copper windings around it. If this is very badly corroded, then the pump motor should be replaced. In this case, the corrosion was just enough to cause the motor to hang, so all that needed to be done was clean it up and put it back together.
In other cases, pumps may go bad due to the motors or pump housings burning up. In this case, you should see some obvious heat damage, but be sure to look closely. Pump bodies that have run dry may be scored and have to be replaced. In other cases, it may just need a new impeller. If the motor is burned, then it needs to be replaced. In most cases, both motors and pump bodies are separately replaceable, saving you the cost of buying a whole new pump. The motor for this pump could be had for as little as $30.
To clean it up you need a piece of bronze wool or a brass (preferred) or steel wire brush the size of a tooth brush. Using this, clean all the rust off the motor housing, the armature and end plates, being careful not to damage the lacquer like insulation on the windings. The end plates are aluminum and all the corrosion needs to be cleaned off on the ringed grooves that fit into the motor housing so that end plates will align properly, and not become out of alignment because of corrosion buildup. Scrape with the corner of a flat screwdriver blade if necessary.
The stator consists of the two large magnets inside the motor housing. If there is corrosion on these, take your bronze wool or brush (CAUTION: do not use steel wool!!! The steel fragments will adhere to the magnets and ruin the motor.) and clean any corrosion off the motor shaft. Now put a single drop of oil on the shaft in way of the end bearings and spread it over the shaft. Put some on those rusty end end plate threaded rods too.
The brushes need to be checked for wear and burning. You can see from the photo above how long they are when nearly new. If they're down to the nubs, then they're worn out, at which point you can opt to replace the motor or attempt to get replacements. Keep in mind that to replace them, you'll have to solder the wire connections on to the wire terminal points on the holder.
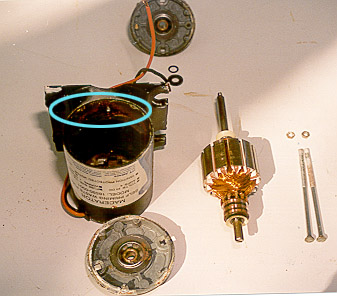
Dismantled view of motor. The circled area denotes area of heavy corrosion that was inhibiting the motor rotation. Once cleaned up, the motor ran freely. When taking apart, be sure to make note of which way all
Now you're ready to put the pump back together, and here's where the tricky part begins -- how to inset the commutator into the brushes without parts flying all over the place because they're spring loaded. The trick is to use pieces of masking tape to wrap the brushes and hold them in place. You need a length more than enough to wrap a complete revolution so that the tape sticks back on itself, but without sticking the tape to the brush holders. Bear in mind that the tape has to come off once it's partially assembled. Also put your tape overlap on the OUTSIDE of the holder plate.
Insert the rotor into the housing. Now gentle place the brush holder plate so that the brushes fit over the commutator and snap the plate into the slots on the motor housing. Tweezers work best for pulling the tape off the brushes, but you have to be sure to get all of it out. After this, you place the opposite end plate on the shaft and back into position, aligning the long bolt holes so that they're the same on both sides. Some motors will have positioning slots while others don't.
As you try to feed the two long bolts through their holes, the magnets are going to be giving you trouble as they pull the bolts off course, refusing to allow them to go into those tiny little holes. There's only one solution for this problem -- PATIENCE. Just keep playing with them and you'll eventually get them in the holes at the other end. Once you've got one, put the nut on it quickly so it doesn't fall back out.
Putting the pump end back together is fairly simple, but you do have to be sure to get the gaskets, cover plate and end body in the proper alignment or the pump won't work. Be sure that the orifice notches are all aligned the same way, and that you've got the rubber ring and metal washer in the right order. You did make that sketch, didn't you? If not, now you know why this was recommended.
Before final assembly, coat the gasket surfaces on all sides with a thin layer of silicone gasket cement. Within the neoprene impellor pump body, its very important that the layer of gasket cement not be so much that it's going to squeeze out into the pump body where it may interfere with the impeller. The edge of the pump body is less than 1/8", so I usually use a very small screwdriver blade to spread the cement around in very small amounts, and quite thinly. Just enough to make a good contact with the USED paper gaskets.
Notice now the order in which the various parts go together. The bronze impeller goes on last, while the neoprene impeller goes on the shaft first. It's best to do a dry assembly first, before you apply the gasket cement, just to make sure you got it right. Once you do, you're ready to button the whole thing back up. In torqing the nuts you use about 15 lbs pressure, which is hard to measure if you don't know what 15 lbs of hand pressure is. In any case, it's neither light nor very hard, but somewhere in between.
When I do these rebuilds I usually have a spare 12 volt battery nearby for testing. You can take the pump to your car or boat battery and simply put the wire ends against the terminals to briefly test it before reinstalling. With a gas powered boat, be sure there are no fumes in the bilge before doing this. You're nose should tell you.
Summary
The same basic methods can be used to repair any type of rotary vane pump. Once you've done one, you'll feel a lot more confident approaching the next one. Whether it's crapped out due to water damage or buggered impellers, these pumps are frequently repairable. Pumps that have overheating damage due to running dry or excessively long are not.
These days most products have a way of becoming obsolete almost overnight. Not so for marine pumps. Many of these things have been in production for decades. Do-it-yourselfers almost never throw old pumps away. If you replace a pump, you save the old one and repair it, keeping it around as a back up. For the current boat or the next. Over time, you can save a heck of a lot of time this way.
See companion article Repairing Diaphragm Pumps
Posted February 28, 2000


 Visit davidpascoe.com for his power boat books


David Pascoe is a second generation marine surveyor in his family who began his surveying career at age 16 as an apprentice in 1965 as the era of wooden boats was drawing to a close.
Certified by the National Association of Marine Surveyors in 1972, he has conducted over 5,000 pre purchase surveys in addition to having conducted hundreds of boating accident investigations, including fires, sinkings, hull failures and machinery failure analysis.
Over forty years of knowledge and experience are brought to bear in following books. David Pascoe is the author of:
In addition to readers in the United States, boaters and boat industry professionals worldwide from nearly 80 countries have purchased David Pascoe's books, since introduction of his first book in 2001.
In 2012, David Pascoe has retired from marine surveying business at age 65.
On November 23rd, 2018, David Pascoe has passed away at age 71.
Biography - Long version